Not long ago, I was having lunch in a chain restaurant in the mall (it's not as depressing as it sounds). I wasn't gussied up to the nines, but I'd brushed my hair, done my makeup, and had jewelry on. My usual public appearance.
Next to me at the bar was another shopper, and I think she was about as typical as any lady at the mall whom I could dream up. On her head was a crisp, white baseball cap. Her brown pony tail was fed through the back of it. She wore a Texas Longhorns T-shirt, running shorts, and running shoes. She had a Rolex big enough to put your eye out, and the biggest, BJ diamond ring I have ever seen in my entire life. She carried a name designer handbag. Her iPhone was glued to her ear the whole time as she picked through her salad (how nice that was for whomever she was talking to, the sound of her smacking as she blabbed).
I never can quite reconcile the incongruousness of these elements on a person's body — the exercise clothes, which have been commandeered for day wear, and accessories whose total value equals annual earnings for many other people. What gives? Where did this habit originate? My own memory is that I began to see this in about the late 70s and early 80s in Houston. Velour track suits (many with designer labels!), and diamonds. Perhaps we could blame this on New Jersey.
If the intent is to look put together, the effort has failed. If the intent is to look insouciantly casual, the effort has also failed. Why the determination to ignore what the cap, T-shirt, shorts, and shoes signify ("I've been at the track up at the high school"), and impose the status accessories ("I've been a very good girl, wink, wink") over them?
Whatever happened to the lady's luncheon clothes?!
Monday, November 22, 2010
Tuesday, November 16, 2010
Using Multi-Sized Patterns — Blending Sizes

Wednesday, November 10, 2010
Dealing With Hems of Flared Skirts

http://www.burdastyle.com/techniques/another-hemming-technique-easing-in-fullness-from-the-hem-allowance
Wednesday, November 03, 2010
November Sewing With Style Meetup
 |
| Kristen shows us yet another pair of well-made pants. |
 |
| Susan and Angela try to figure out my method of adding a bias strip to a hemline. (And this is just a "wearable muslin" of my vintage skirt pattern!) |
 | |
| My Sandra Betzina skirt has a wonderful tab closure at the waist. |
 |
| Angela's Lady Grey coat from Colette Patterns is underlined with hair canvas, which our friend, Jeannie, at The Common Thread sells. Not usually found much in ATX! |
 |
| The Lady Grey pattern. |
 |
| Joanne's making a knit top. |
 |
| Susan's working on this pinafore (that's "jumper" to us Yanks) from a Burda World of Fashion magazine). |
 |
| Her bodice is almost ready to be joined to the skirt. |
Tuesday, October 05, 2010
Sewing With Rosebud in Novi, MI

Rosebud, a veteran of production sewing, is an educator for Islander Sewing Systems. Our garment was the Islander "City Western Blouse," which we had to have cut, marked, and interfaced before we arrived in Novi. When I prepped my garment pieces, I noted we would be abandoning the usual 5/8" seam allowance that is the standard in typical home sewing patterns. For this project, many of our seam allowances were 3/8", others were even 1/4", and only the side seams (which were flat-felled) were 5/8'. There's no trimming and grading seams in a shop, of course, and no hot pressing or steaming anything.
Oh yeah, no pins, either, of course. Many of our practices in our sewing rooms at home just slow down a production sewist, or "operator." Think of it as the difference between someone who wrenches on his own vehicle at home, and someone who puts cars together in a factory. The process is so different, and so are the results, not to mention the motivations.


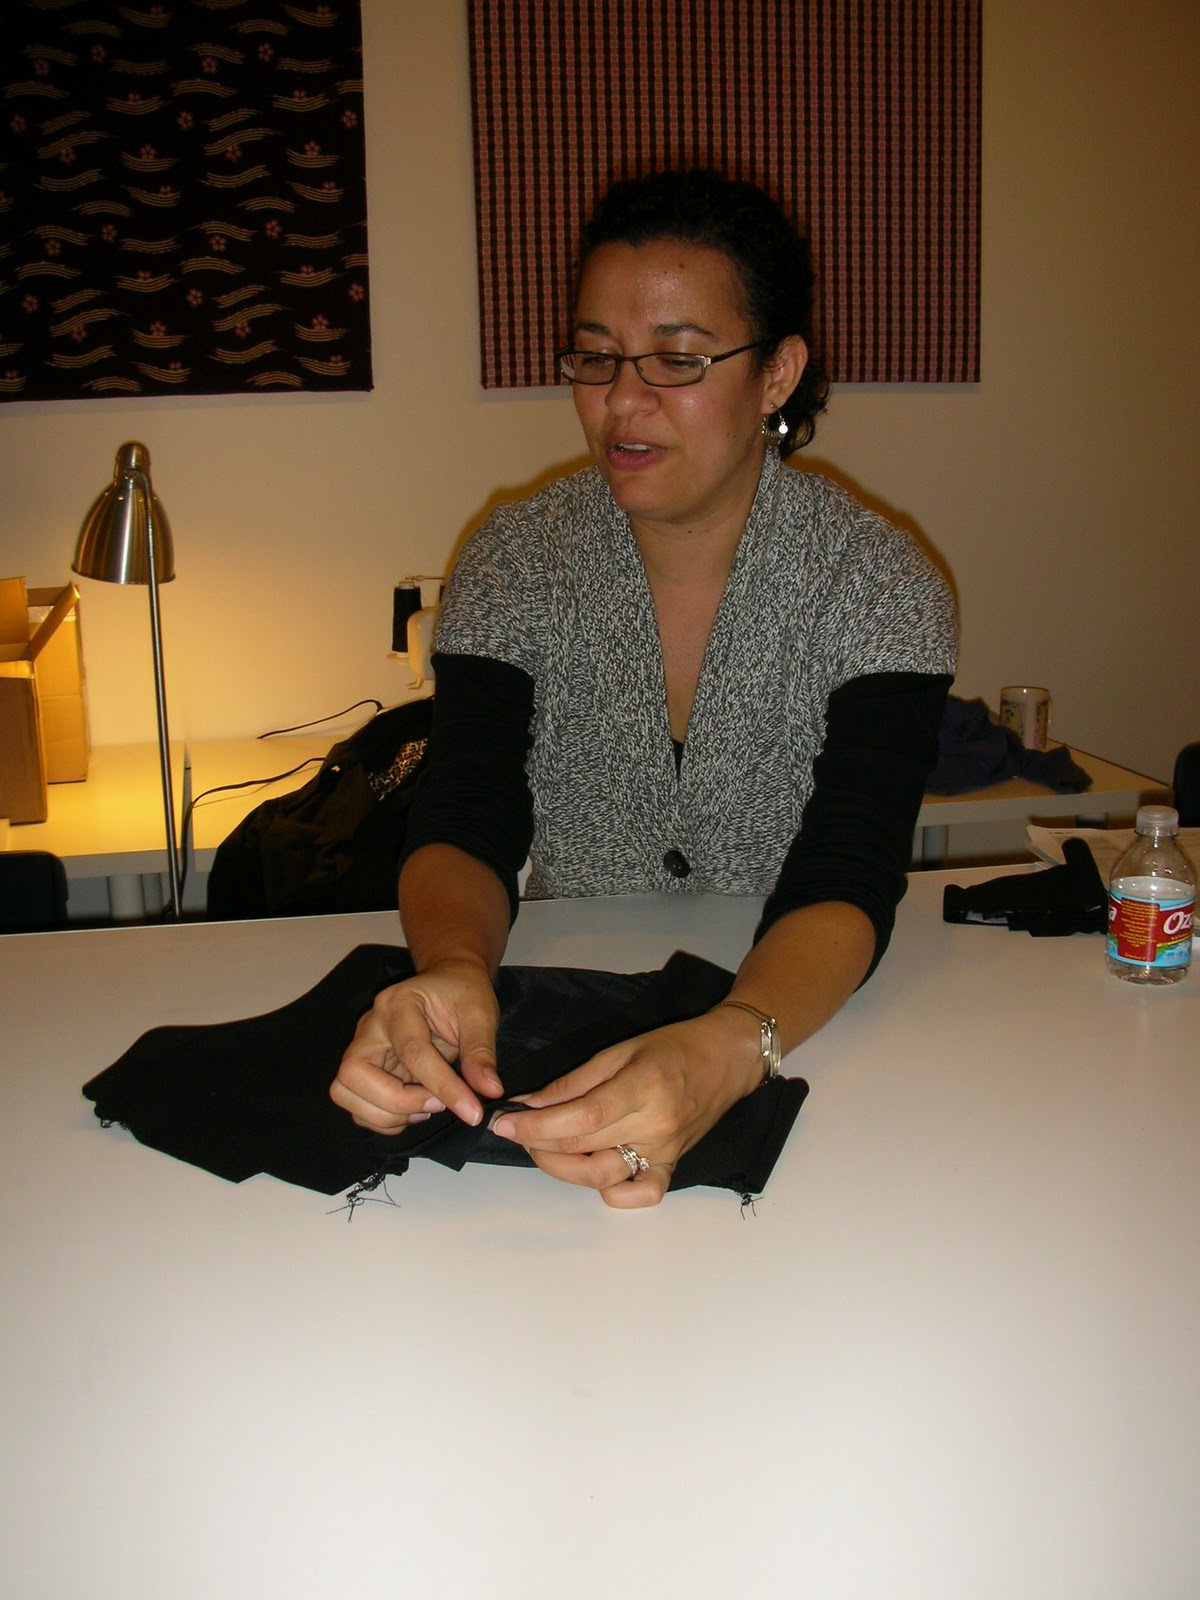
"Thumb on the bottom, fingers on top," Rosebud reminded us frequently. If there's anything an average home sewer can incorporate into her habits, it's that. Keeping your hands in this position as the machine grabs the work and pulls it in is one of the hallmarks of faster sewing, and it saves you from getting all kinds of hand problems and pains. Here's how: Hold the work just like the photo above. Sew until your fingers get close to the presser foot and you can't see what you're doing. Stop sewing for a second and re-grasp and reposition the work, and repeat the process until you've completed the seam. This is really different from putting in pieces that are pinned together and sort of "feeding" the machine with fabric — which is certainly my own tendency.
Friday, October 01, 2010
The Standoff
Last week I attended some of the American Sewing Expo in Novi, MI. I had a wonderful couple days in workshops before a foot fracture prompted my early exit.
But what I'd like to ponder for a moment is, the standoff in the home sewing world these days. On the one hand, we have the grey ladies of sewing. We know them by their unstyled hair, sensible shoes, and machine-embroidered sweatshirt ("Meow," it says, right under the cat's head). As they trudge away from the sewing show, laden down with enough fabric, patterns, and sewing supplies to warrant a sherpa, I can't help wondering where all those nice things will disappear. Not into well-made, well-fitting garments for themselves, I'm pretty sure.
Contrast this against the smaller-in-number-but-loud-n-proud, D.I.Y. fashionistas. They may or may not have had a grey lady in their lives to inspire and teach them, but they gravitate toward tutorials and products that proclaim, "This ain't your grandma's sewing! [quilting][knitting][embroidery][whatever]." They may "have the patience" to learn to sew from a printed pattern, but often, not. The tattoo budget has been tapped out, leaving no funds for good fashion fabric, it seems. They sometimes lack basic skills, such as turning a hem. Learning these things would inhibit creativity, they protest.
I'm not always inclined to find a middle ground. I like to commit to a side. But in this case, I really think there's so much to be gained from each woman learning from each other. I'd like to see more grey ladies taking care of themselves and sewing things they feel great wearing. I'd like to see more fashionistas taking their craft more seriously by devoting more time to learning its basics, and forgoing the fabric from the $1.99 table. I think we can all help each other, if we can only get past our judgments. I would love to know what that feels like. As a first step, I'm not even going to post any pictures.
Tuesday, September 14, 2010
Copying A Favorite Garment


One of the most frequent questions I hear from budding sewists is, "I have a favorite top [pants, jacket, dress]. Can I make another one just like it?"
Yes, you can. It can be pretty easy, too!
There are several methods for making a pattern from a finished garment. The method I used for copying this top is by far the easiest and requires only the tools and materials you should already have on hand in your sewing room (or corner).
You need pins with a head on them, muslin or an old, plain bedsheet, wax chalk or a soft crayon, markers, and a ruler.
I won't get into an exhaustive tutorial here, but I'll describe the process. First, lay your garment flat. Insert pins into the seams of the garment every one or two inches, leaving the head of the pin exposed and the point of the pin pushed all the way into the wrong side of the garment.
Next, lay a fairly generous piece of muslin over one section of the garment at a time. Make sure it's all nice and flat and smooth. Now it's time to go back to your preschool days. Remember when they'd give you a piece of paper and a crayon and send you outside to do a rubbing off textured surfaces? Take your wax chalk or soft crayon and do this same thing. Rub your crayon over all the little pin heads. The outline of your pattern piece will appear!
This was fairly easy, in my case. I had to make a neck yoke, a shoulder yoke, and a bodice. The front and the back of this top are mirror images of each other.
 |
| My pattern pieces. Notice that you must draw in your grainline. |
 After you've done a rubbing of every piece of your garment, you must add stitching lines, grainlines, and seam allowances. You've also got to decide on an order of construction. And for what it's worth, if you've never sewn pants with fly closure, or a tailored jacket, don't make these sorts of garments the first thing you ever copy.
Here's my neck band piece, stapled to some newsprint. Notice I've added my seam allowances. Once you've tested the pattern in some cheaper fabric, you'll know how successful your copying was, and where you need to make changes. Then, make a clean copy of your pattern onto some pattern tissue or pattern marker paper.
 |
| I wanted to make sure my pattern was just right before I cut into my fabric. It's hand-screened with a Peach Berserk print. |

The finished result. Notice I left off the bottom band that the original garment had. I decided I didn't really need it. That happens a lot when you copy a garment. "It's perfect, oh but I want to change this about it … and that …"
Friday, September 10, 2010


Tuesday, September 07, 2010

Tuesday, August 31, 2010
Using Twill Tape

Head over to BurdaStyle for this week's tip — using twill tape!
Tuesday, August 17, 2010
French Seams
http://www.burdastyle.com/techniques/more-serger-less-seam-finishes-the-french-seam
This week's post links to BurdaStyle.

This week's post links to BurdaStyle.
Tuesday, August 10, 2010
A Way To Make A Christmas Stocking With A Lining
I really do love to make holiday decorations, and I do mean for all holidays! It seemed like when I was growing up, we were always making something in anticipation of a holiday. I remember quite clearly sitting at the kitchen table in July, creating tree ornaments for the coming season. It was a bit of a different world then, I guess, one that didn't recognize not everyone celebrates Christmas or has a "nuclear" family life. But judging from the proliferation of crafts and decorating projects on the Web, the urge to bring handmade things into your home hasn't died out at all.
Here is the result of my retreat into that happy time — an embroidered stocking that has a lining. This project is from a 2009 issue of Better Homes and Gardens Creative Collection magazine. The pattern pieces and embroidery image were included in the magazine.
I started by embroidering my image by hand on embroidery linen. Both items are readily available in craft and fabric stores. I really love to embroider, it's a way to let go of everything.
I used some cotton duck I had on hand for my stocking back. The cuff pieces have been backed with fusible, non-woven interfacing. What a great way to use up that old interfacing, since it's not very good for apparel sewing.
I cut my lining pieces out of some nice, white cotton broadcloth.
A stocking with no way to hang it up is no good! I made a loop, and enclosed it within my top seam.
Here is the part that I think's really ingenius: Sew the front and the back together, like it was a pillow. Read on.
With right sides together, I've sewn the back and the front, leaving myself an opening in the lining big enough for me to easily put my hand into. Before I turned the whole shebang right side out, however, I trimmed and clipped my seams to eliminate bulk. It really makes a big difference. I pressed my stitching well.
At this point the stocking is almost done. I closed the opening in the lining. Then, I tucked the lining inside the stocking and pressed the whole thing again.
Why not do some Christmas decorations now? December always seems way too crazy to start then. Get ready earlier. I can't wait to hang these in my sewing room on December 1st!
 | |
| I embroidered my girl elf on linen first, then cut out the shape of the stocking. |
 |
| I sewed a cuff to my stocking front, and to a plain stocking back. |
I started by embroidering my image by hand on embroidery linen. Both items are readily available in craft and fabric stores. I really love to embroider, it's a way to let go of everything.
I used some cotton duck I had on hand for my stocking back. The cuff pieces have been backed with fusible, non-woven interfacing. What a great way to use up that old interfacing, since it's not very good for apparel sewing.
I cut my lining pieces out of some nice, white cotton broadcloth.
 | |||
| Next, I placed a lining piece over the stocking front and stocking back, and stitched across the top of each one. |
 |
| Notice I also made sure I included a loop for hanging. Yes, this is the boy elf now. |
A stocking with no way to hang it up is no good! I made a loop, and enclosed it within my top seam.
 |
| The view of the front stocking piece and its lining, from the wrong side. |
Here is the part that I think's really ingenius: Sew the front and the back together, like it was a pillow. Read on.
 |
| Leave an opening so you can turn the whole thing right side out. |
 |
| The turned and pressed stocking is almost done. |
At this point the stocking is almost done. I closed the opening in the lining. Then, I tucked the lining inside the stocking and pressed the whole thing again.
 |
| I'm ready for Christmas already! |
Why not do some Christmas decorations now? December always seems way too crazy to start then. Get ready earlier. I can't wait to hang these in my sewing room on December 1st!
Tuesday, August 03, 2010

Tuesday, July 27, 2010

Tuesday, July 20, 2010

Saturday, July 17, 2010
Friday, Friday . . . So Sad It's Friday
It's as predictable as the sun coming up . . . Thursday of sewing camp takes on what I call a "disco" mode, with everyone sewing a second or third project, getting fitted in another pattern, talking, comparing, laughing, and beginning to think about how much she will miss the new sewing friends she's made. Friday morning, things take on a new, silent seriousness, as the mad rush to complete projects ensures, and more sadness as the hours march by and another week with Sandra Betzina comes to a close.
Sandra told us her father said, "Entertain the people you do business with in your home," and that is why at the close of each sewing camp, she has all 10 of us (plus various friends, family, and spouses) for dinner at her exquisite loft in SOMA near AT&T Park.
Here's how the week shook out:

 Diane, Burda magazine expert, shows Jenni how to find the pattern and size you want on the pattern sheet.
Catherine made a fabulous pair of pants. I was nice and didn't take a photo of her booty, even though it does look fly.

Buoyed by her success with the Anda dress, Carol worked on another project. She's learning what a sleeve pattern looks like, a bodice, a facing. It's pretty weird if you haven't done it before!

Sandra fine tunes the fit on Lyn's dress. This is a very important dress because Lyn is being honored at an event for her years of fundraising for Planned Parenthood.

 Alden finished her vintage dress!
Jenni made a skirt from this wonderful Japanese linen/cotton eyeglass print she got at Piedmont. A print with cameras is underneath. Did I mention Jenni's a budding genius? Yes, I did. But I can say it again.

 Sandra showed us the first dress she ever made. It was when she was in the 8th grade. Even then she had the best taste in fabric! This shirtwaist dress is in the highest quality cotton jersey.

Diane sewed one of the new patterns from Sandra's line.
I'm channeling my inner Joan Holloway.


Cat's "convertible dress." She didn't make it at sewing camp, but isn't it fabulous?
http://www.theconvertibledress.com/

Jenni's apple dress. She said she was very hungry while she was shopping for fabric.
Well, that's it for another week of sewing camp. I love my new and old friends, and the thing we share: sewing, sewing, sewing!
Sandra told us her father said, "Entertain the people you do business with in your home," and that is why at the close of each sewing camp, she has all 10 of us (plus various friends, family, and spouses) for dinner at her exquisite loft in SOMA near AT&T Park.
Here's how the week shook out:


Catherine made a fabulous pair of pants. I was nice and didn't take a photo of her booty, even though it does look fly.

Buoyed by her success with the Anda dress, Carol worked on another project. She's learning what a sleeve pattern looks like, a bodice, a facing. It's pretty weird if you haven't done it before!

Sandra fine tunes the fit on Lyn's dress. This is a very important dress because Lyn is being honored at an event for her years of fundraising for Planned Parenthood.


Jenni made a skirt from this wonderful Japanese linen/cotton eyeglass print she got at Piedmont. A print with cameras is underneath. Did I mention Jenni's a budding genius? Yes, I did. But I can say it again.


Diane sewed one of the new patterns from Sandra's line.
I'm channeling my inner Joan Holloway.


Cat's "convertible dress." She didn't make it at sewing camp, but isn't it fabulous?
http://www.theconvertibledress.com/

Jenni's apple dress. She said she was very hungry while she was shopping for fabric.
Well, that's it for another week of sewing camp. I love my new and old friends, and the thing we share: sewing, sewing, sewing!
Friday, July 16, 2010
What Everybody's Making at Sewing Camp


Sandra's eldest daughter, Kim, is with us at sewing camp this week. No, she doesn't sew much and had never wanted to learn until recently. She's making a faux fur vest, that lucky San Franciscan! Kim is super proud of her admirable mother.

This is Cat, Sandra's and Kim's friend who relocated to San Francisco from Portland. What a sweetie! She's copying a favorite top and making it in what she and Kim refer to as the "bad boyfriend fabric." It's a thin, hard to handle jersey that doesn't want to behave.

Jenni's embellished camo dress! She has made about six garments so far this week. This dress is for prom . . . in 2011. She has to plan ahead because she's so busy with school. She wondered aloud today if there was such a thing as sewing boarding school. If so, let me be the headmistress.

Without a doubt, today's happiest gal was Carol, who made her first garment ever this week at sewing camp. This is the Anda dress from BurdaStyle, their most-downloaded design. She chose a camo-like silk and even sewed French seams!
Subscribe to:
Posts (Atom)